The RevList by Revlis
7 Instagram Reel Formats Found in 27 Outlier Posts
A close look at 27 outlier posts found seven repeatable Reel formats. See how each one works and what kind of lesson it can hold.
You may know what you want to teach, but you may have no idea what the Reel should look like. Should you talk to the camera? Should you use a chart? Should you hold something up, show a list, or compare two choices? When every idea starts as a talking video, it can be hard to show the lesson in a way that feels clear and new.
We studied 27 outlier posts from one Instagram creator to see which video formats she used more than once. We found seven main formats. This guide will show you what each format looks like, what kind of lesson it works well for, and what you need to plan before you film it. You can then choose a format based on what your audience needs to understand.
What we looked at
The account belongs to Jessie Schramm, a fitness and nutrition coach. Her current Revlis page has 97 tracked posts and 27 posts marked as hits. For this guide, we used a smaller group of 27 outlier posts that had already been picked for a video-style playbook. An outlier is a post that did much better than the creator’s normal posts.
We watched what happened on screen in each post. Then we grouped posts that used the same basic setup. For example, videos that placed items under one of two labels went into one group. Videos that moved items into a ranking chart went into another group.
These numbers only tell us what we found in this group of 27 posts. They do not mean these are the seven best formats for every creator. They also do not mean the format was the only reason a post did well. The topic, opening, examples, timing, and trust in the creator may have helped too.
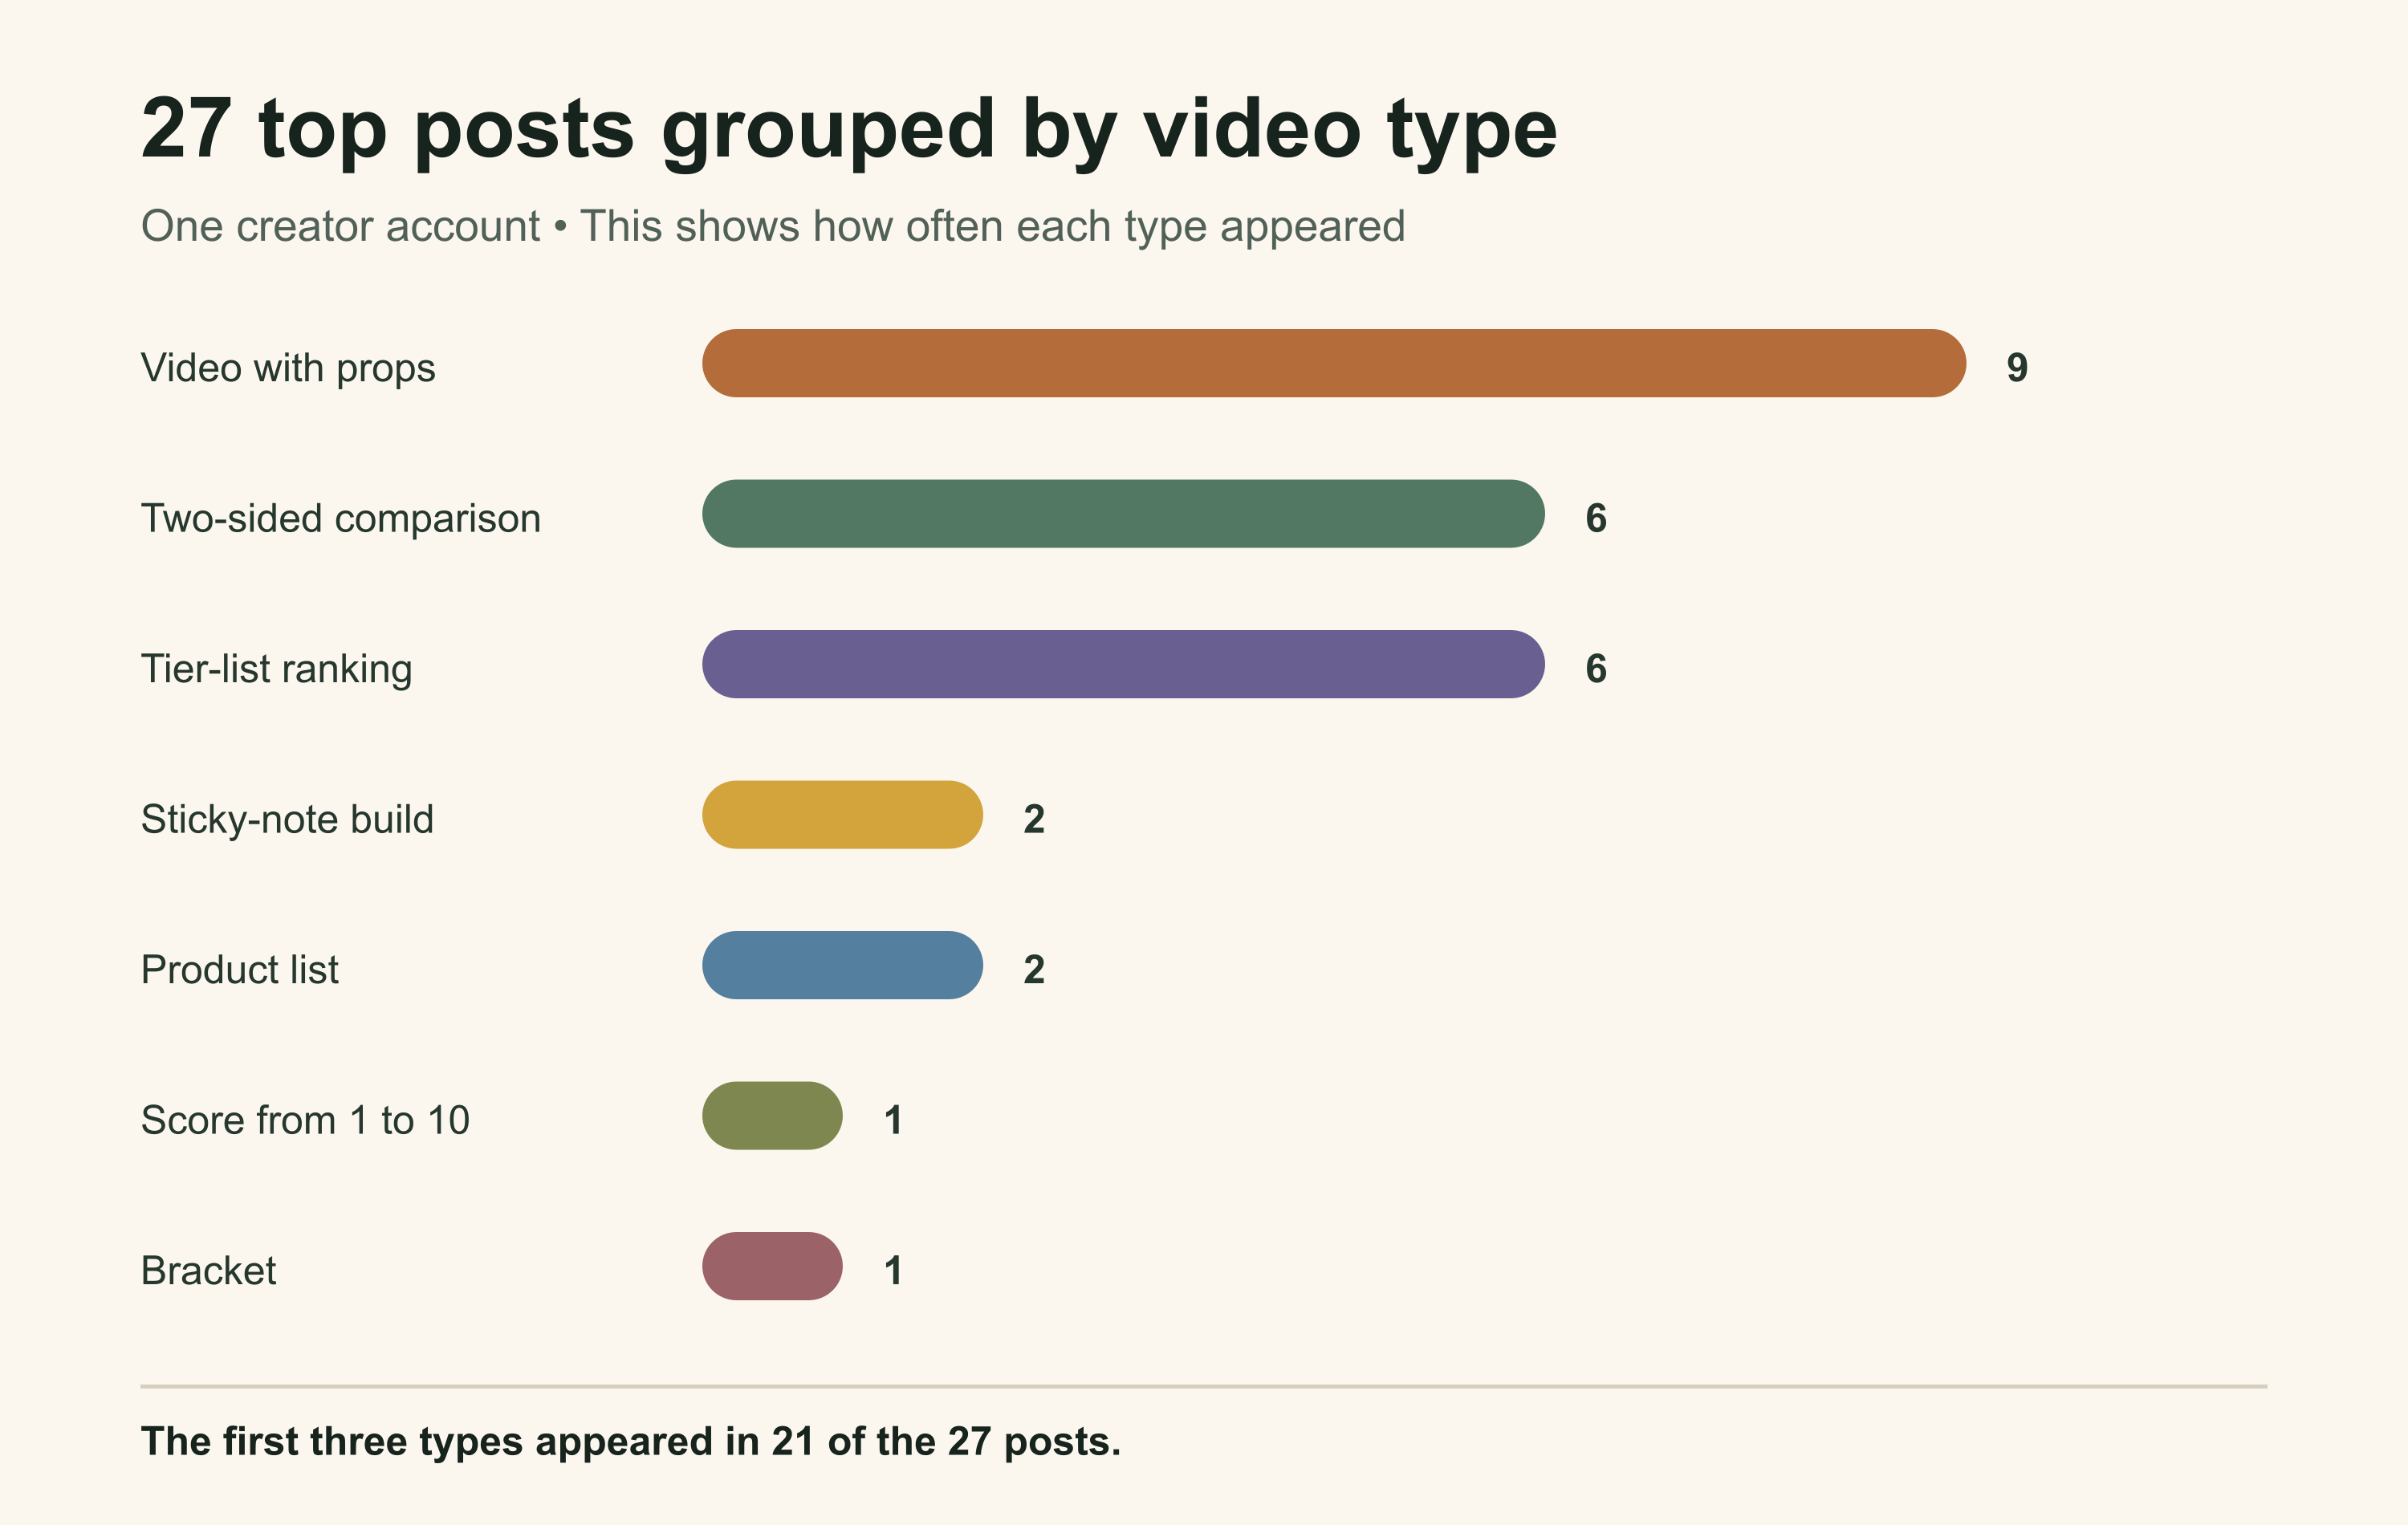
(A bar chart showing seven format families across 27 outlier posts: nine prop-led explainers, six binary comparisons, six tier-list rankings, two sticky-note builds, two practical product lists, one scoreboard rating, and one tournament bracket.)
1. Use props to show an idea people cannot see
Found in the group: 9 of 27 posts Works well for: Ideas that are hard to picture
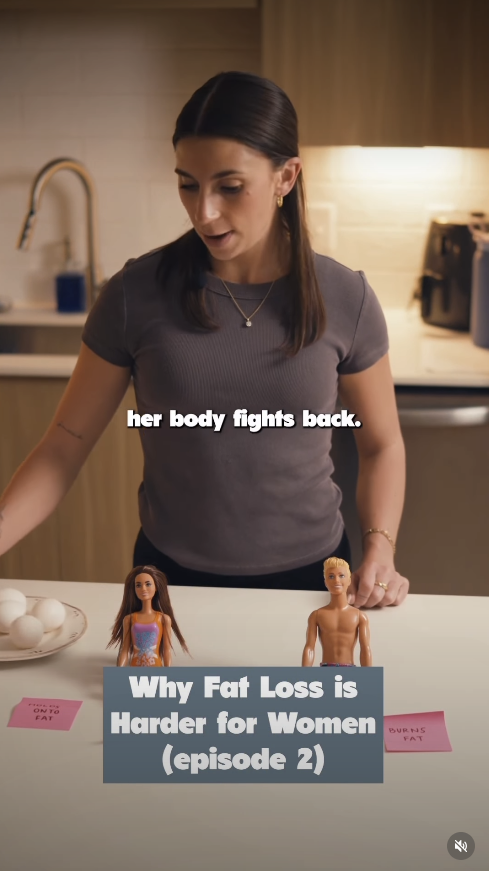
In this kind of Reel, the creator uses real objects to help explain the point. A cup can stand for money. A block can stand for one step in a plan. A toy person can stand for someone in a story. The object gives the viewer something simple to look at while the creator talks.
In this prop video, Jessie uses dolls, bowls, sticky notes, and food items. The objects help show a difference between two people. We are looking at how she shows the lesson, not saying that the health advice in the video is right or wrong.
You can use this kind of video for many topics. A money coach could use jars to show where a paycheck goes. A manager could use toy people to show where a project gets stuck. A content teacher could use cards to show how one topic turns into several posts.
Before you film, decide what each object means. Keep that meaning the same through the whole video. If a red cup means “time” at the start, it should not mean “money” later. The props should make the lesson easier to understand, not give people more things to figure out.
2. Put each choice on one of two sides
Found in the group: 6 of 27 posts Works well for: Clear differences between two choices
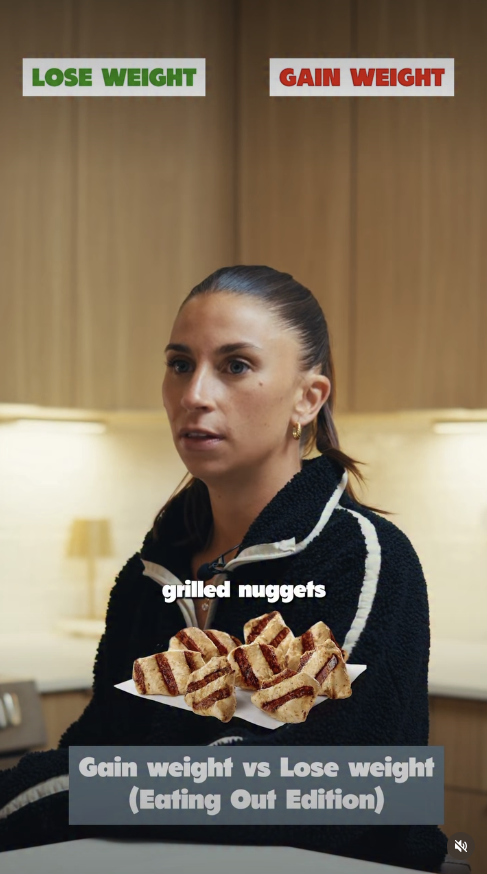
This format splits the screen into two sides. Each side has a short label. A new item appears, and the creator places it under the label that fits. The viewer knows what to watch for because every item has to go somewhere.
In this two-sided food Reel, the two labels stay at the top of the screen. Food images appear one at a time, and each one goes under a label. The creator gives a short reason before moving to the next item.
You could use this to compare clear and unclear client requests, tools for beginners and tools for experts, or things to fix now and things that can wait. The labels need to be short enough to read fast. The reason for each choice also needs to follow the same rule.
Do not force a hard subject into only two boxes. Some choices need more detail. If you keep saying “it depends,” a score, a chart, or a longer lesson may work better than two sides.
3. Rank several choices in a tier chart
Found in the group: 6 of 27 posts Works well for: Putting several choices in order
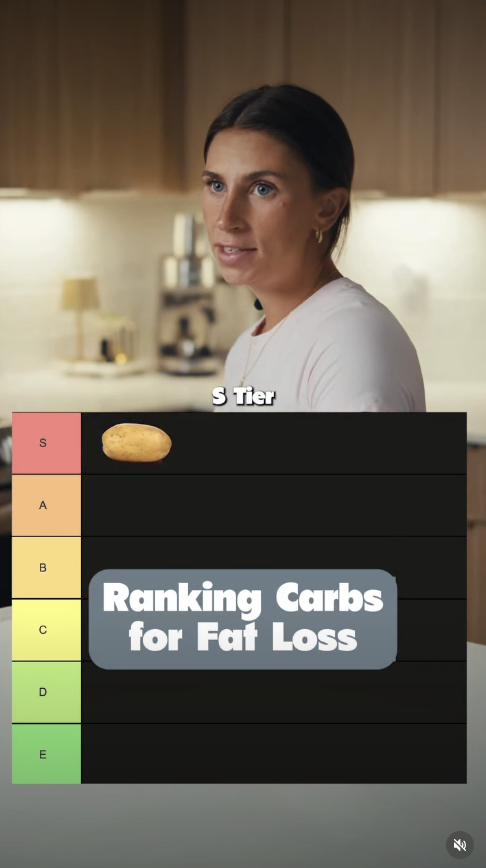
A tier-list Reel starts with an empty chart. The chart may have levels such as S, A, B, C, and D. The creator shows one item, explains where it belongs, and moves it into a level. The same steps happen again with the next item.
Jessie uses this setup in her carb ranking Reel. The first food starts the video right away. She gives a reason for its place, moves it into the chart, and then brings in the next food. By the end, the viewer can see the full ranking.
You could rank email openings, work habits, editing apps, home tools, or ways to study. The chart helps people keep track of a longer list. It also gives them a clear way to agree or disagree with your choices.
Decide what each level means before you film. Does the top level mean easiest, cheapest, or best for a beginner? Use the same rule for every item. If the rule changes halfway through, the ranking will feel random.
4. Build the lesson with sticky notes
Found in the group: 2 of 27 posts Works well for: Steps, plans, and parts of a system
A sticky-note video starts with an empty board, wall, or table. The creator adds one note at a time as the lesson grows. Each new note shows another step, part, or answer. At the end, the viewer can see the whole plan in one place.
In this sticky-note Reel, the creator uses different colors to show stages and what each stage means. The health claim in the post would need its own fact check. We are using the post as an example of how to build a visual lesson.
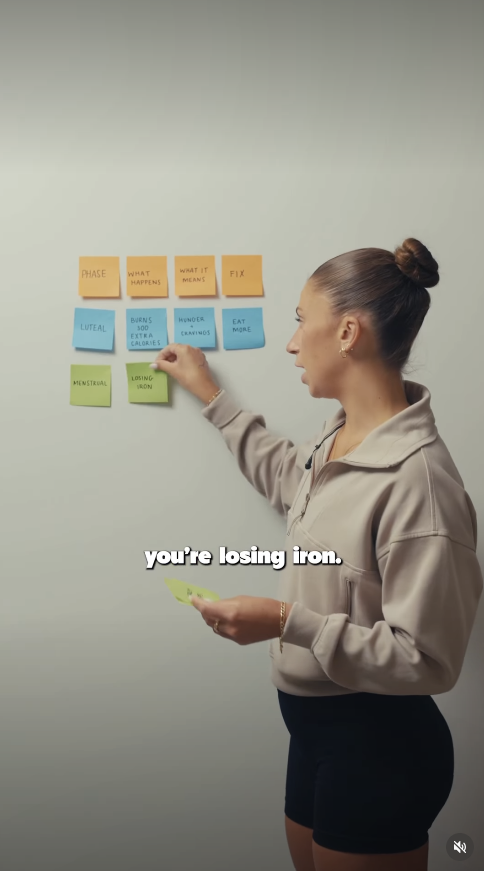
This can work for a weekly plan, a customer path, a study guide, or a list of steps. A social media manager could start with one topic note. Then they could add the target audience, the question, the video style, and the next step for the viewer. The finished board would show how the whole post was planned.
Keep the words on each note short and large. Use only a few colors, and give each color a reason. Check the video on a phone before you post it. If you cannot read the notes on a small screen, the viewer probably cannot read them either.
5. Show a list of real products or choices
Found in the group: 2 of 27 posts Works well for: Giving people several useful options
This type of Reel moves through a list of real items. The creator may hold each item, show a photo, or put the name on screen. They give one short reason why the item made the list, then move to the next one. The viewer always knows that another choice is coming.
This list Reel shows drink choices with words, pictures, icons, and a notebook. The items are easy to spot as the video moves. We are studying the way the list is shown, not using the Reel as health advice.
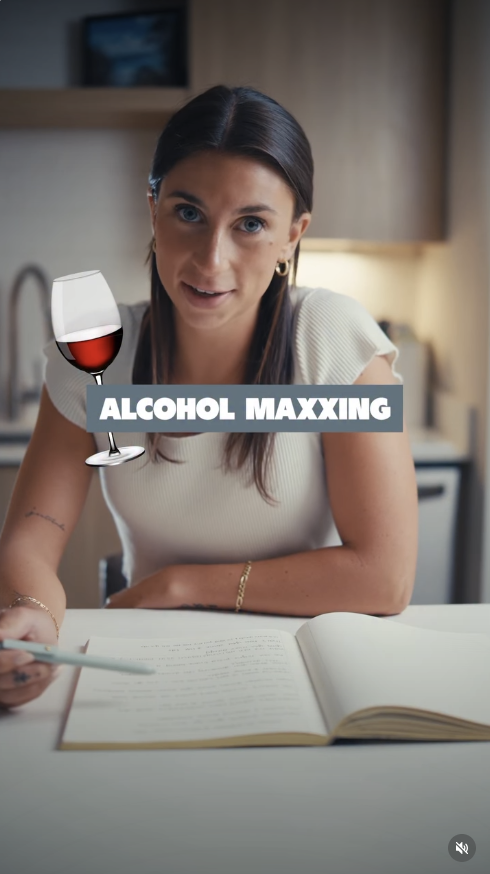
You could make a list of five microphones under $100, three snacks that travel well, or four pages a new business website needs. Make the list for one person with one problem. “Five things I like” is much less helpful than “five free tools a new freelancer can use to send an invoice.” A clear title tells people why they should keep watching.
Show each item clearly and explain why it belongs. Tell the viewer about any limits that matter. A tool may only be free in one country, or a product may only work well for a beginner. Those details help the viewer make a real choice.
6. Give each choice a score
Found in the group: 1 of 27 posts Works well for: Judging several choices with the same rule
A scoreboard Reel keeps one scale on the screen. The scale may run from one to ten, bad to good, or easy to hard. Each new item gets a score and a short reason. The viewer can compare the new score with the choices that came before it.
In this scoreboard Reel, a one-to-ten scale stays at the top. A new drink appears, gets a score, and then leaves room for the next one. The repeated setup makes it easy to know what is happening at any point in the video.
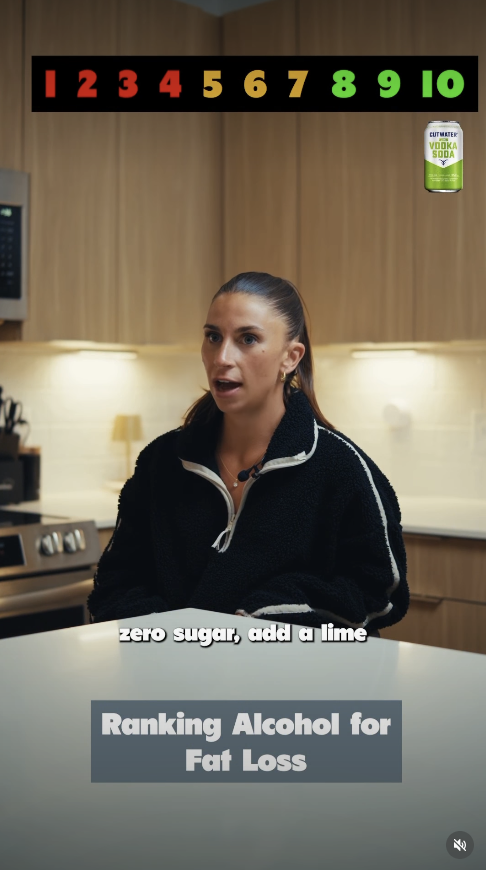
The score needs a clear meaning. You could score tools by how easy they are to use, meals by how fast they are to make, or hooks by how clear they are. Tell people what a high score means before you start giving numbers.
Use the same rule for each choice. Do not score one item based on price and the next one based on how it looks. If the rule keeps changing, the final scores will not help anyone decide.
7. Use a bracket to pick one winner
Found in the group: 1 of 27 posts Works well for: Choosing one winner from a group
A bracket starts with several choices. Two choices face each other, and one moves to the next round. That process keeps going until only one choice is left. The viewer can make a choice during each round and see if it matches the creator’s pick.
Jessie uses this setup in an alcohol bracket Reel. Two drinks go against each other in each part of the bracket. One moves forward until the video reaches the last winner. Again, we are studying the video setup and not giving health advice.
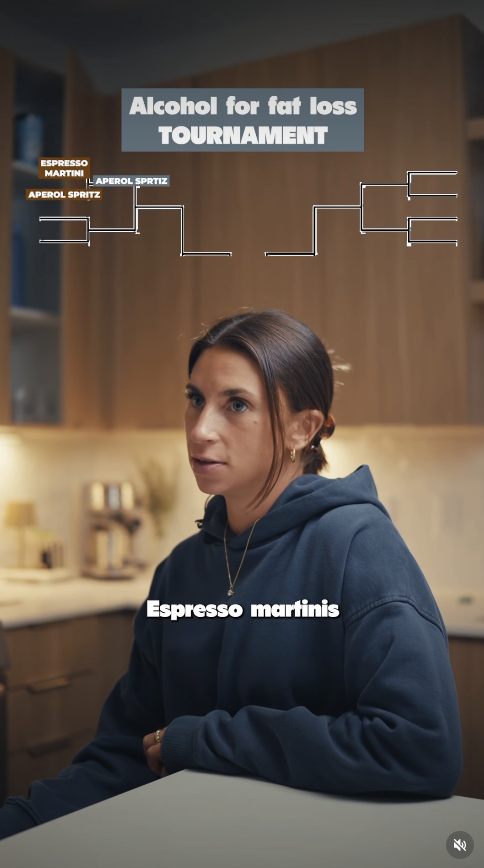
You could make a bracket for work tools, breakfast ideas, travel bags, camera setups, or video hooks. This format works best when there is a fair way to pick the winner. Tell people what rule you are using before the first match starts.
Keep that rule the same until the end. If you choose one winner because it costs less and another because you like the color, the final answer will feel made up. The viewer should be able to follow how each choice won.
One topic can work in several formats
You do not have to connect one topic to only one format. Start with the question, “Which hook should I use for an educational Reel?” You could answer that question in several ways, and each version would help the viewer think about it differently. The best choice depends on which part of the answer you want to teach.
You could put hook types into a tier list and rank them for one goal. You could score each hook from one to ten based on how clear it is. You could compare clear hooks with vague hooks on two sides of the screen. You could also use cards as props and move each card while you explain what that hook does.
The topic stays close, but the viewer gets a different job in each video. In a ranking, they watch the order. In a bracket, they pick between two choices. In a prop video, they watch the idea take shape. That is why the format should match the part of the lesson you want people to understand.
How to choose the right format
Start with the part of your lesson that may be hard for people to follow. If they need to see a difference, use two sides. If they need to see an order, use a ranking. If they need to see a hidden process, use props or build it with notes.
Then think about what you can make well. A simple chart with large words may work better than a crowded bracket with tiny text. You do not need the format that looks the most creative. You need the one that helps the viewer understand the answer.
How Revlis helps with this research
Revlis lets you study strong posts beside the rest of a creator’s account. You can open a post and look at the topic, hook, order, video style, message, and other parts. This helps you explain why you saved a Reel instead of only saying that you liked it.
You can then save the part you want to test. Maybe you want the two-sided screen, the ranking chart, or the way the creator used props. In the Laboratory, you add your own audience, lesson, examples, and what you want to say. The goal is to use a helpful way of showing an idea while making a video that gives your audience something new.
Turn psychology into content that converts.
Explore the platform behind The RevList and start building smarter campaigns.