The RevList by Revlis
How to Make a Green-Screen Videos
Learn what can go behind you in a green-screen video, how to record it in an app or editor, and how to keep the final frame clear.
There are many ways to make greenscreen videos. In one video, you may stand in front of a screenshot. In another, you may stand in front of a photo, a group of images, or a moving clip.
They all use the same basic effect. The green background disappears, and something else takes its place. But the background changes how you record and edit the video.
This guide shows the main types of green-screen videos, how to choose a background, and how to make the video easy to follow.
What is a green-screen video?
A green-screen video cuts you out of your background and puts an image or video behind you.
You can use a green-screen effect inside an app. You can also record yourself first and add the background later in an editor. The first way is faster. The second way gives you more control.
Commentary is one way to use green screen. You can also explain a chart, answer a comment, show a product, compare images, or point out what happens in another video.
The main types of green-screen videos
The background can be still or moving. That is the main choice. Inside those two choices, you can use different kinds of material.
Use a screenshot, post, chart, or comment
Use a still image when people need time to read or study one thing. That could be a post, a chart, a review, a product page, or a comment.
In this Revlis research example about Instagram reach, the creator stands in front of a screen with numbers about views and watch time. The background stays still, so the viewer can look at the numbers while the creator talks.
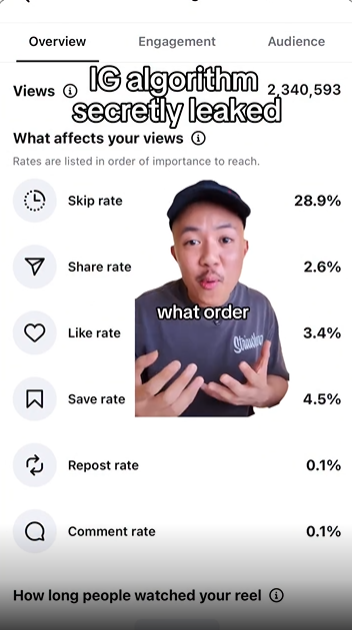
Make the important part big enough to read. Crop out anything you do not need. Hide private information. Keep your body away from the words you are talking about.
Use a photo or group of images
A single photo can show a person, product, place, or example while you explain it. A group of images can help you compare things or show several examples.
This is still-image green screen, even if you move, point, or change the image during the video. The background itself does not need to move.
In this research example with a group of images behind the creator, the creator stands in front of a group of images. The images set the scene, but the creator still needs to explain why they are on screen. The background should help the point. It should not just fill space.

Do not put five tiny images behind you if the viewer cannot tell what they are. Use fewer images and make them bigger. Tell people what to look at.
Use a moving video
Use a video behind you when people need to see a change, a gesture, a cut, or a set of steps. One still image cannot show those things.
In The Shark Tank content secret, the person in the source video and the creator appear in the same tall frame while the clip plays. The viewer can see the words, the speaker, and the creator's reaction as they happen. That kind of setup needs a timing plan.
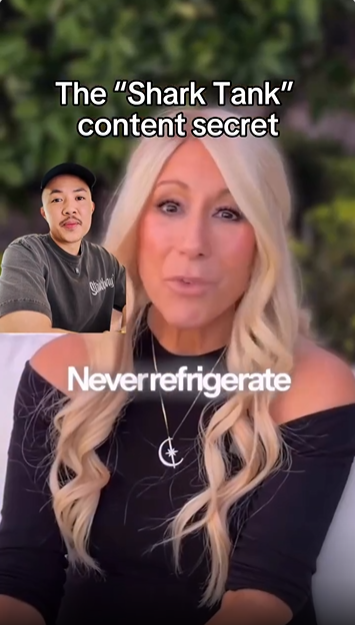
Choose only the part of the video that supports your point. Decide when the clip plays, when it stops, and what you say during the pause. If the whole lesson fits in one frame, use a still image instead. It will be easier to record and easier to watch.
Pick how you will record it
Use a green-screen effect in an app
This is the quick way.
Open the camera in your app.
Find the green-screen, photo-background, or video-background effect.
Choose the image or video you want behind you.
Check that it is large enough to see.
Record yourself while you talk, point, or react.
Watch it back before you post.
TikTok's buttons and effect names can change. Other apps may use different names too. Check the current controls in the app you plan to use. Read TikTok's Effects guide.
Use this method when you need one background and simple timing.
Record yourself and add the background later
Use an editor when you need exact pauses, more than one background, or a better layout.
Record yourself, then remove the background in the editor. Add your screenshot, photo, or video behind you. Resize the background and move yourself so the important part stays visible.
This takes longer, but it helps when the source changes several times or you need to point at exact details.
Plan the video before you record
Write down four things:
What is behind you?
What do you say?
What should people look at?
What happens next?
For a screenshot, you might point to one line, move aside, and explain why it matters. For a moving clip, you might let it play, pause on the key moment, explain it, and start it again.
Your words should match what people see. If you talk about a number after it has disappeared, they have to guess what you mean. Keep the background on screen long enough for people to follow.
Keep the frame easy to read
A green-screen video can show your face, the background, captions, arrows, and app buttons at the same time. That gets crowded fast.
Choose what people should see first. Make the background larger when they need to read it.
Do not stand on top of the headline, chart, face, price, or step you are talking about. Leave room for captions. Watch the finished video on your phone. A layout that looks fine on a large screen may be hard to read on a small one.
Check the video before you post
Watch it once with the sound off. Then ask:
Can I tell what the background shows?
Can I read the important words or numbers?
Do the background and my face cover each other?
Does the timing match what I am saying?
Credit the creator when credit is needed. Credit is not the same as permission. Copyright rules depend on the source, the use, and the country. If you are not sure, use your own image, a licensed source, or a simple mockup. See TikTok's credit guide, TikTok's copyright guidance, and U.S. Copyright Office fair-use information.
Start with one simple setup
For your first video, use a screenshot or photo. Stand to the side, point to one part, and explain it. Then try a moving clip when your lesson depends on timing.
If you study a green-screen example in Revlis, look at what is behind the creator, whether it moves, where the creator stands, and when the background changes. Then make your own version with a different subject, example, and words.
Turn psychology into content that converts.
Explore the platform behind The RevList and start building smarter campaigns.